Fully Digital Solution for Full Denture in an Edentulous Patient, Wax Rim & Try-In Workflow (EN2-D) (4 Visits)

For Experts Only: Scanning an edentulous patient presents it's own set of challenges. For those clinicians willing to go through the Calibration Process, this workflow can save time. This workflow adds a step for a physical try-in.
Overview for this Workflow
If your patient presents with no existing denture and we have to “start from scratch” but you want the added benefit of an esthetic try-in, this workflow is for you.
Be warned: edentulous scanning is not for the faint of heart. Soft, mobile tissues require a completely different approach to capturing your scans.
This workflow, though challenging, has real benefits for you as the clinician and for the patient.
The outcome for this solution will be a digitally designed complete denture with a blueprint stored in the RDL Design Vault for up to 10 Years.
Patient Identification


Benefits of This Workflow
The primary benefit of the Fully Digital Immediate Denture Workflow with your chairside scanner is that the records are digitized and the patient’s future treatment options are easier to manage. No significant improvement in chair visits can be had with this method.
Clinical and Lab Goals
Indications & Contraindications
Setting Patient Expectations
Before you begin, explain to the patient that you’re going to be using the latest technology. Focus on explaining we can “3D Image” your mouth and it becomes permanently digital. In the future, we won’t have to “start from scratch” because we have this as a baseline.
This 3D capture of the patient’s mouth is an excellent diagnostic tool in the design process, and something that would be destroyed in the process of fabricating a traditional denture. Digital Imaging improves patient outcomes.
First Clinical Visit

In this visit, you will capture the key diagnostic impressions needed to complete the case
First Visit Keys to Success
- Decide on and record the patient’s desired shade.
- Scan the patient’s arch with the appropriate scanning protocol for your intraoral scanner.
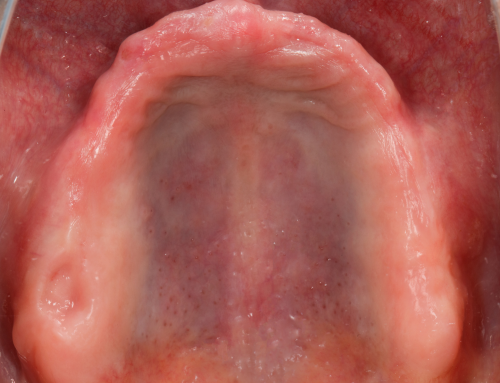
- Make sure the following landmarks are captured:
- Maxillary
- Maxillary Tuberosities, including posterior to the tuberosities.
- Muscle Attachments
- Periphery/vestibule areas captured cleanly and without scatter or gaps
- Mandible
- Periphery captured without scatter or overlap
- Muscle Attachments
- Retromolar Pads
- Maxillary

First Laboratory Procedure
The laboratory will use the initial scan of the patient’s affected arch to fabricate a traditional bite block.
Please Note: RDL is currently working on identifying a solution to the problem of adequately capturing vertical in patient’s with insufficient contact. As soon as a viable solution is found this workflow will be updated.
The Lab Will Return:
- The Bite Block
")
Second Clinical Visit

Bite Capture
The Lab will return a partial arch wax rim to you with appropriate structures to capture the bite scan.
Chairside, you will scan the patient both WITH and WITHOUT the partial AND capture the bite with the appliance in the mouth. Send this information to the lab for us to begin the denture design process.
Second Laboratory Procedure
At the lab, we will do Basic Smile Design and evaluation, design the denture according to any specifications required, and produce a 3D Printed, high quality, repeatable denture with a 10-Year Vault Guarantee.
- Basic Smile Design
- Denture Design
- Denture Production
The Lab Will Return:
- The Patient’s New Denture

Third Clinical Visit

Diagnostic Try-In Denture
- Available in Multiple Options to meet clinical needs
- Check traditional markers:
- Fit
- Function
- Form
- Evaluate shape and esthetics
These digitally produced try-ins tend to fit and perform better than any previous denture. We’ve even had patients leave with the try-in until the final denture is seated. Fit is excellent.
Third Laboratory Procedure
Once returned to the lab RDL’s Design Team will take your measurements and suggestions (if there are any) and design your patient’s new Digital Denture.
RDL will fabricate the Final Denture of your choice.
")
Final Clinical Visit

Delivery
The patient’s new, digitally designed and fabricated denture should be ready for delivery with minimal adjustments after extractions. The new digital record can be used as a reference for the patient’s final denture down the road, and will provide the lab with more diagnostic information than if we had followed traditional impression procedures.